Monday, March 26, 2012

I'm Aliiiiive!

I haven't been doing much, mostly because I started up school again after about a decade... yeah.  That makes me sound old, haha, but it's a long story.

A week or so ago I got the urge for some new "hoodies".  However, I love personalizing all mine with my favorite bands instead of leaving them plain and boring.  In the retail world, if you're lucky enough to find a hooded sweatshirt for your favorite band, it can cost about $40...and chances are it may not even zipper up the front, which limits its usage, in my opinion.  Most of my favorite bands don't even have the option of buying sweatshirts, though.

Sooo we arrive at me trying to find suitably warm sweatshirts to modify...when all the stores are bringing out their light and airy spring/summer clothing.  I thought this would be the best time to score something on clearance, but it turns out the women's sections in most stores aren't even stocking hooded sweatshirts that thick at this time of the year.  Menswear had a lot of options, but none of them fitted as closely.

The boy's section, however, was a success! About $13 bought me two thick, hooded, plain zippered sweatshirts, one of which was a larger size and fit me comfortably, while the other was "smaller"--which only translated to "shorter".  The significant other laughed at me, but it looks like a cropped hoodie in my view.  So I lengthened the sleeves with patches, and I like it!

Anyway, I used stencils and painting to decorate one so far, and here's where the bulk of my post comes in.  I decided to take some pictures of the process, so I've got a tutorial of sorts for stenciling--and making your own faux-screenprinted shirts!

1)  Now, technically, the first step would be to get your stencil, cut out a piece of freezer paper to 8.5x11 inches, and run it through the printer to get your stencil.  I'm using a text stencil provided free from Stencilpunks.org, but you can make your own stencil by printing out an image and modifying it into a stencil as you go, too--as I've done with an image later on in this post.  Remember, freezer paper is only shiny on one side, and the dull side is the side you want the printer to print on--or else the ink won't stick, and you'll make a huge mess.  Trust me.

2) You'd then cut out the image with an exacto knife--no need to reverse or muddle with the image, by the way, since this isn't screenprinting.

3) Then you want to prep your image for ironing, like so:

Stenciling Step 1

Stenciling Step 2

4) Iron the image down, making sure the shiny side is facing the fabric, and the dull side is facing you.  Once again, trust me on this--you don't want a mess!  I mentioned in the picture that "4" was the best setting on my iron, I believe it was for cotton blends.  Remember, you're ironing paper and wax as well as fabric--so you don't want the setting so high that the paper burns... or the wax burns up, either.  If your setting is too low, though, it won't adhere at all.  Be careful that you don't over iron, because then the wax will all melt and soak into the fabric, destroying the adhesion it usually creates.  And iron in one area at once--do not glide the iron, since you don't want to distort your image. 

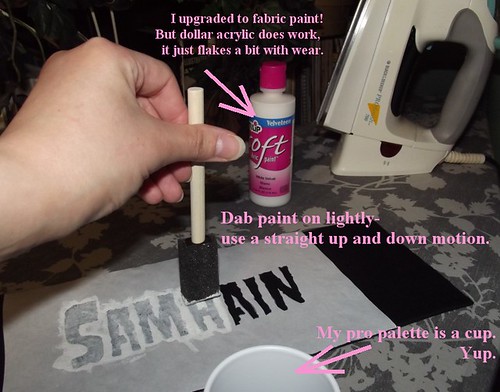
5) Paint! I mention dabbing lightly in a straight up and down motion--this will try to minimize any paint bleeding, which can occur when you force too much paint underneath the paper stencil, or the edges of the stencil have cracked or missing wax. 

Stenciling Step 3

This first layer looks pretty bad, but you can go over the first thin layer with some thicker layers later.  You've now created a barrier at the edges of your stencil that will help prevent further bleeding, so you can be a little more liberal with the painting in the next layer(s).

6) You've painted, it's dried... now peel the paper away!

Stenciling Step 4

Stenciling Step 5

Stenciling Step 6

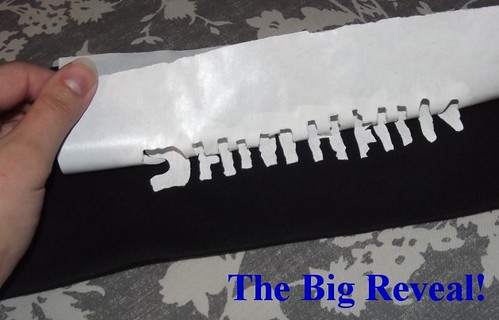
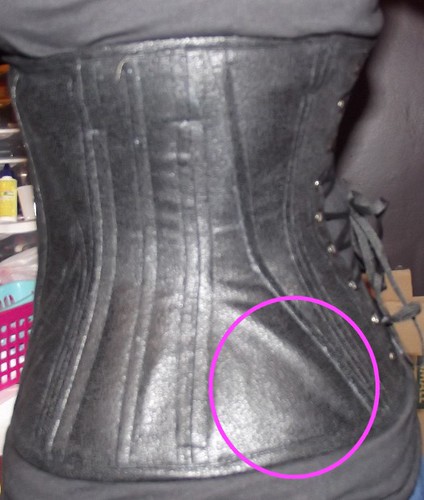
Aaaand you're done!  Now, I pointed out the bleeding in my image--it isn't noticeable from far away, but if you are very concerned about this and know you cannot prevent it 100% (as I can't... I'm too hasty!), you can modify the lines of your stencil to account for the extra fraction of a millimeter that the bleeding will add. 

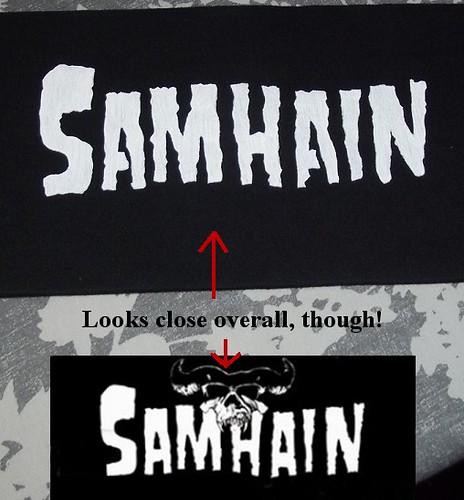
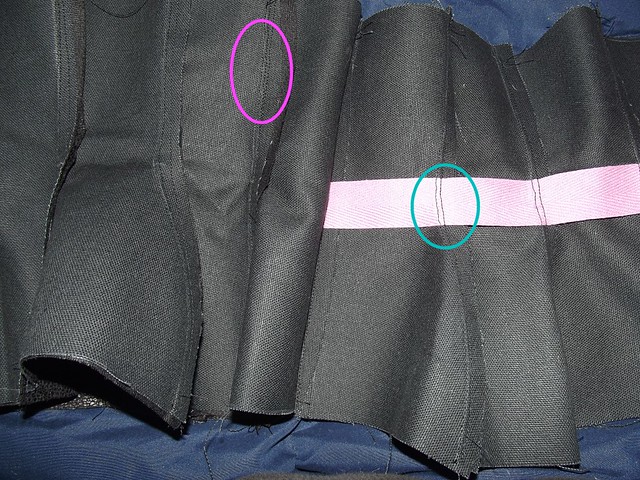
This brings me to my second stencil for this sweatshirt--I made this one myself by simplifying the band's iconic demon from an old gig poster, which you can view here.  Since the lines are a lot more intricate and detailed in this, the bleeding caused one or two problems outlined in green--easily fixable with some black paint, but you could also prevent this by making the lines of the stencil thicker as well.

Stenciling Step 7

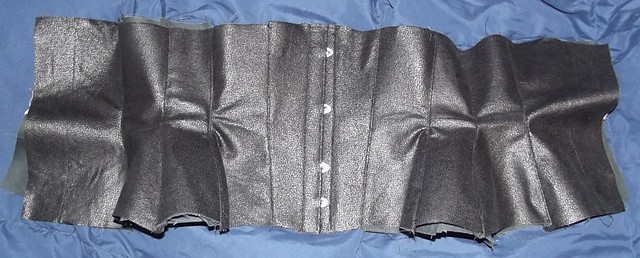
After this part, I went back with some black paint, and re-added the details that I took out when making the stencil.  The result is an image that looks a lot more complicated than a mere stencil, but it just as easy to reproduce pretty accurately:

Stenciling Step 8

Maybe I'll add pictures of the finished thing as a whole later--unfortunately, I haven't grabbed any photos of myself in it yet!


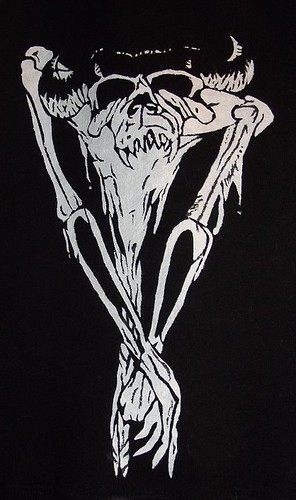
And, since I mentioned different types of paint on fabric in one of my images earlier, I thought I'd share the results of painting fabric with the extremely cheap acrylic paints you can find in craft stores as well. I used no "fabric mediums" or anything on this.  I freehand painted this about 4 years ago, I think, and I decided about 2 years ago to go over it once more to make the print stand out once again.  But this shirt has been well worn and washed quite a bit!  The craft acrylic has flaked (it's most noticeable in the top left corner, where the flash didn't wash it out)...but look!  It even stayed over top of the zipper!

The Lasting Power of Cheapo Acrylic on Fabric.

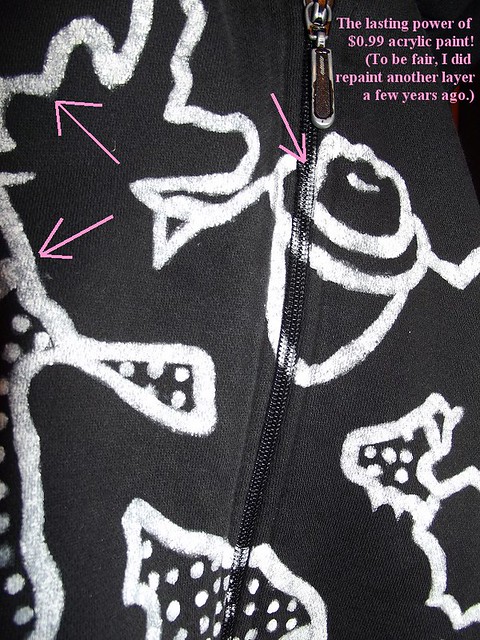
Now, I noticed that the Tulip fabric paint I used this time around was thicker than regular acrylic--I needed less paint to get a solid, non-splotchy layer, and the paint did not seep through the fabric as it does with plain old acrylic paint.  This is most noticeable with acrylic, though, only if you are painting a large area--for line work like the image above, there was minimal seeping.

The Tulip fabric paint is supposed to work better on bendable stretchable surfaces, but we'll see how truthful that statement is with time, I guess.

Tuesday, February 7, 2012

So Behind!

For the corset sew-along, that is.  I got to distracted trying to finish my other corset...and then dogs and going back to school got in the way, and I haven't felt like sewing!  I'm pinning the final pieces together currently, we'll see how long that all takes. 

But I am finished with my underbust corset!  I took some better pictures this time:

Underbust #2 Front

Underbust #2 Side

Underbust #2 Back

I'm quite pleased with the binding at the top front, although the bottom is just a tad uneven.  I used a blanket binding  method, by the way.  I cut out two-inch wide strips of my fashion fabric, folded it in half, sewed it to the top edge of my corset with the raw edges  next to each other (like I was sewing a side seam), and then turned the folded edge over and stitched it down from the front.  Since it was a knit suedecloth, it molded itself around the edges perfectly.  It doesn't look the best in the inside, but that's because my strips were a little too thin, I think--if they were wider, it would have allowed my stitches to catch the binding on front and back.  It's secure, though, so I'm not worrying.   

The side view is the same one I showed last time; I fixed the wrinkle almost completely!  The loose thread is still there in the photo, though--I still need to tie it down and hide the ends.

The back is still not a great photo, but it will do.  I vertically boned my modesty panel with three leftover bones, but I should have done some horizontal boning, because as you can see, it wrinkles together.    I made a "floating" panel, so it's being held to the corset by two sets of grommets which the lacing goes through, but I'm thinking if I tack down the one side of it to make it an adhered panel, it may be easier to coax into laying flat when I put it on.

And for a bit of a better view of the shape it gives, here's a slightly farther away shot... the lighting turned out bad, but you can still see the silhouette.

Underbust #2

Yes, those are my xbox huge hips that flare out even to the hem of my shirt and after.  I'm wearing the corset loosely, so it only compresses my waist by about 1.5 or 2 inches, but the effect looks good so far.

Sunday, January 29, 2012

For Your Aching Bones..

A heating pad!

Homemade Heating Pad

I made this a while ago, but since I had a chance to use it recently, I figured why not take some pictures before it gets even MORE covered in fuzz.

It's really just a basic rice-filled cotton bag.  That's all.  There are so many tutorials for them out there on forums and blogs, but to me they're either too floppy (just a sack the rice can fall all around in--thanks, gravity) or too structured (sewing the rice into tiny little tubes works fine, I suppose, but when you stuff it too much it won't really conform to all your achy curves).

So, I combined the two ideas and sewed mine together with four separate stitch lines, neither of which intersect or connect.  You can kind of see the stitchings in the picture--they stop in the center before the middle skull in the trio's teeth, and they stop before the edges of the bag, as well.  The little unsewn sections provide some place for the rice to move around to, but it will mostly evenly stay in the four sections.  This means you can wrap the bag around your neck, drape it over your shoulder blades, lay on it...whatever you like. The rice won't all fall to one corner, and the heating pad won't fold like a piece of cardboard! 

I plan to make more, so I can probably shoot a photo of my "pattern" later on.   In the mean time, here's a photo of it holding its shape even after I fold it up--the color is also a little more accurate in this one:

Heating Pad Floppiness


PS: That fabric?  It's some print I found in the remnants at a fabric store around here... I think it's by Robert Kaufman.  But I love it because it's not the normal bright tacky sugar skull print, AND IT REMINDS ME OF HELLBOY.  The moment I saw the print I was reminded of Mike Mignola's simplified skulls and limited color palettes.

Look a bit Familiar?

But shhh, don't tell anyone I'm a geek.

PSS: Those same "tutorials" on the internet all suggest filling your bags with calming lavender essential oils or some such thing.  Being that I like heating pads to make me feel better so I can, you know, do stuff, and not sleep, I decided to scent mine with a vanilla pomegranate... Bad idea.  Apparently when you heat some essential oils they just smell like cheap plastic laced with fragrance.  So, in the future, I will not be scenting these things, thank you very much.

Saturday, January 28, 2012

I Finished It!

Well, almost.  You can see in this rather blurry side picture below that I have ONE major wrinkle still left in my underbust:

Underbust #2--99.9% Finished!

So after putting in 10 bones--one  1/2inch one at each seam, and one 1/4th inch one on each side of the grommets--I realized that my corset still retained a lot of the minor wrinkles you can see in my last post.  So I went back and added more bones, this time all 1/4th inch ones. On each side I added two at the front, one at the middle, and one at the back.  This eliminated the problem almost entirely, and it was good enough for me.  So that's 18 bones altogether, not including the busk. I could have put another pair on the opposite side of the grommets, but, well... my hasty sewing errors didn't allow for enough room there.

Then, when sewing the binding on,  I unknowingly moved the top knit layer a teensy bit.  Now my wrinkle is back!  But I'm hoping a few well placed hand stitches along the binding layer will fix it.  I guess this is what I get for securing my knit fashion layer to the duck cloth at the side seams only, and not at the top and bottom, too.

Otherwise, I'm pretty pleased:

Underbust #2--99.9% Finished!

I mean, the binding edges aren't perfect, but it was my first time.  I think I may need to make a quickly boned modesty panel because, well, can you SEE that back fat by my laces in that blurry picture?  Overall the corset is a little too small in the top back area, so I get a little "back fat" spillage over the top.  Drafting error #1.  I'm hoping that evens out with a different bra and a little more wearing in, though.  As you can see in the above picture, the bra/shirt combination is also covering the top of my corset, and maybe pushing it down a tiny bit.  I didn't notice this problem with another bra I was wearing during the mockup, and I didn't notice as much of a "back fat" problem, either, so I'm hoping switching back to a different undergarment will fix a bit of the problem.

I ended up taking 1 inch off the length over my hips; the pattern I made cupped them fine, but looked a little dramatic/costume-y. This was drafting error #2: I built the corset to be 9 inches high, but I drafted it as if the 9 inch line went straight from my underbust down to my full hip.  When I edited in the curve I wanted, the line came out to be quite a bit longer than 9 inches, more like 10.5 or so.  (If I were more awake I might have some more technical math and geometry oriented explanations for this, but I just can't find the right words.) I also loosely lengthened the front to accommodate the 9 inch busk I had.  It makes a pretty nice point, I think.

Oh, yeah, and I got size 00 grommets--which work pretty well with my cheap-o grommet setter, and I'll have to post photos later--but I accidentally put in two of them backwards.  I put in a third backwards on purpose after I realized the first one was backwards, to try and "even it out" on each side, but uhh..... yeah, I'm just thoughtless sometimes!  I used the hole punch on this, too, since I could not get 4 layers of duck cloth and two layers of suede cloth to stretch evenly enough to properly put into a grommet.  That's my fault, since I wasn't sure how many layers to keep in the back, and just went for "more is better". 

But I don't even have pictures of the back of my corset at the moment, so that's the third minor finishing touch I still need to do. :)

Monday, January 23, 2012

More of that corset...

I've been really into finishing this the last few days.  Even though I worked, I did some stitching around the edges  of the fashion layer/second strength layer pieces to secure the fabrics together and make them act "as one".  Then I sewed them together the other night....

Underbust #2 - Almost Done!

It's looking pretty good, in my opinion!  There are a few of the hip pieces that "wrinkle" weirdly due to the very curvy seams, but those wrinkles aren't sewn in, so I'm hoping the boning sorts that out.  In fact, I just noticed now that in this picture, the wrinkles are pretty much identical on each side, which leads me to believe my problem may really be as superficial as I think.  The next step is to add boning and really test it out.

Now, here's some shots of the inside to show my method!  You see, I have a habit of trying something different every time I try to construct a corset....even though, like I mentioned before, I've never yet entirely finished one.  For this one, since I was using duck cloth for strength, and was unsure at the time about its properties,  I decided to do an inside layer of duck, and an outside layer of duck topped with my fashion fabric.  They are sewn separately, only connected at the busk so far. 

Underbust #2 Seam Stitchings

In this photo, if you enlarge it, you can see that in the fuschia circle there are three sewing lines.  This is my top layer, and the right-most line is the one that is holding my suedecloth to my duck.  The middle line is the base seam holding different panels together, and the left-most line is the topstitching holding the seam--and the seam allowance--down.   In the blue circle, you can see only two lines--the left being the seam, and the right being the top stitching over it.

Now, it might not look like much in the picture, but you'll notice that the seams of both sides are facing the same direction.  That's because the front side is turned over; when properly laid flat, one side of the seams will face left, and one will face right. The plan is to stitch about 1/4th of an inch from a panel's seam on either side, which will leave me with a built in boning casing--the boning will fit between the seam allowances, giving it two to three layers of protection on either side.  I'm not even sure if that will make sense to ME later on, but there you go.

Lastly, because I sometimes fail at sewing overall... there's the one thing bothering me about my construction so far:

Underbust #2 Topstitching

Once again, you might have to enlarge it to see it, but this is where my top-stitching kind of wavered--mostly, when I was trying to pull the seam into the right shape at the sharp waist curves, the pulling caused me to stitch a lot closer to the seam line than I wanted.  In the left circle there's about a 3mm distance from the seam to the top stitching--this seam is by my ribcage.  In the right circle there's only about 1mm from the seam to top stitching...right at the waist. :(  Since it will get more top stitching, and there's also a waist tape for strength, I'm not too worried about it now. 

Friday, January 20, 2012

Failings

I failed at sewing the last few days.  Really, really failed.

First of all, someone left a burner on for 4 hours the other day--low enough that you couldn't see any flame, so when I finally noticed it, the house smelt like gas.  How is that relevant?  Well, I was afraid to do anything lest I end up in flames.  Seriously, I had visions of a  Watchmen-like fiery death running through my head.

Then I just couldn't quilt.  I tried sewing the sashing on the fourth row of my Halloween quilt, and it was worse than the first row I ever sewed.  I picked out 3 of my 4 rows of in-the-ditch stitches because they didn't catch the sashing in the back.  Then 2 out of 3 of those rows still had to have some "touch ups" to catch all the sashing the second time around.  The one that I didn't have to touch up, well, it's just pretty wobbly looking.

But I'm leaving it; I don't want to get frustrated!

At least I could still sew garments, and spurred along by the sew-along, I started sewing another corset:

underbust01

I got the lining entirely finished; in fact after this picture, I sewed my seam allowances down flat about 1/8 away from the original seam.  The busk is all in, the waist tape is all in, and the front two panels have their top layer and fashion fabric on -- it's some moleskin/suedecloth with a plasticy stuff fused to it, and it looks pretty much like real leather.

I made the pattern myself, but I didn't make a mockup, so we'll see how that comes along!  I was already just a tad bit off with my middle panel; I marked the waist line, but there's more space at the top of it than at the bottom.  There's only two front panels, and three middle/back panels, so I'm afraid the hip curves may start too much towards the front until it get's laced tightly.  But like I said, we'll see.

Wednesday, January 18, 2012

Progress 2.0

In between sewing the corset, I'm also sewing together the center of my quilt.  It's starting to look like an actual blanket now!

Starting to Look Cuddly!

You can tell from the sashing strip at the bottom right that I'm not the greatest at this--but this is my first time doing it!  As I mentioned before, I'm using the quilt as you go method, though instead of using a blanket stitch to hold it all together, I'm "stitching in the ditch" of the front sashing, and carefully pinning to make sure I get the back sashing sewn down with it.  The front sides look pretty good, right?  My stitches are almost invisible up top, except for a few spots where I sometimes "wandered" a teensy bit.  The back, though... I'm not sure if it's stretching out to make uneven strips because I didn't cut on grain, or what. 

But since it's the first time I've done it, as long as it's all sewn down and it hides all the raw edges, I'm happy!

So far I've only done three of the rows that I planned out in this post, so here's to hoping I improve more as well.  I didn't know this part would be so B O R I N G, though!  I didn't mind quilting it, I didn't mind cutting all the sashing... but jeez, sewing all the sashing on is kind of monotonous.  At least when I see it come altogether and look a little more finished, I get happy. :)