Saturday, December 31, 2011

"Country Side" Brambles and Seeds

I don't know what to call this one, honestly.  I really wanted to try out the bramble stitch, but I tend to work with my yarn so tightly that it didn't really go well for me--even less so considering I used a variegated yarn that didn't show off the intricate pattern.  So the brambles turned into a small "band" at the bottom of the hat, and I finished up with a much easier double seed stitch.  Funnily enough, with the variation the yarn makes, you can hardly tell the difference between the two stitches right away, and it looks like one really texturized blob.  Oh well; at least they're pretty colors?!

"Country Side" comes from  name of the Sugar'n Cream yarn I used. And as usual, I used my size 10 round needles, though I didn't knit this in the round (they're just so much easier to use!)

"Country Side" Brambles and Seeds

I only have one more old hat (el oh el) yet to post about...which is good I guess, because I just picked up my needles again and have about two more to show when I get around to it.

Tuesday, December 27, 2011

Blogger's Choice Fat Quarter Bundle

Two posts in one day... what's happening to me?

But I do like mixing and matching my own fabrics, so I figured, why not try out this "contest"?!

Fat Quarter Bundle Idea

The Fabrics (Hopefully these links won't expire!)
Solids:
One Two and Three
Prints, by color:
One Two Three and Four


This started with the three "Delighted" fabrics, but of course I wanted to mix in some simpler prints and such.  Since I tend to like working on small things,  I chose a lot of smaller prints, but the larger prints would be perfect for mixing in larger blocks to fill things out.  I always like mixing and matching--big with small, old with new, etc.--so I think there's a bit of variety here.  I've had the color palette in my head for a while: turquoise and red is so popular, so why not make it an almost-perfect primary trio?  I think the color palette is very summery, not to mention it works for many ages... I tried to pick fabrics that weren't overtly floral, too, so it's a bit more gender neutral, as well, I think.

I'm quite the novice at this kind of stuff, so I'm not sure how I did... Not to mention, since I can't see the fabrics in person, I'm unsure of how all the subtle differences in the individual reds, yellows, and blues will look.  In any case, I know I want to make something featuring a similar palette in the future.


On a related note, I'm totally considering getting this from their store... It's even on sale right now!  And because... arggg, they're pirates!


One more... and then I'm DONE!

This is the last stocking; it's made for my boyfriend's mother, who loves Egyptian-like things.

Egyptian-Inspired Stocking

I'll have to ask you to excuse horrible lighting from the dark walls and yellow lights, the brush ends and jar of glaze, the CDs, the woot monkey in the background, the fact that this is being hung on the ear of a stethoscope....and uh... everything else.   I just wanted pictures before I gave this away, and it was already Christmas Eve! 

Here's one more picture of it standing straight, just because I haven't gotten used to the charms dangling while the stocking is hanging yet, haha. 

Egyptian-Inspired Stocking (from a different angle)

My boyfriend picked out everything for this one, and of course he's not a sewer, so he picked out the slinkiest, hardest-to-work-with polyester lace weave for the decorative side of the stocking. It looks nice, but I had  to utilize some old wrapping paper to stabilize it while making it!  We bought the snake from the bead department of the craft store, and it's held on with some gold wire... as is the ankh, which I think turned out a little too gold for the stocking in comparison with the snake, but oh well.

I made the ankh myself, by the way, out of polymer clay that I had pressed some glitter paper onto to give some texture.  It also just happened to have some nice authentic "cracks" from when I was folding it to warm it up--perfect!  Add a stippling brush and some paint to make an uneven, mottled layer of gold all over, and it came out pretty neat looking...but unfortunately, I have no great pictures of it because of the lighting and flash. 

Here's the thing that I find the funniest of all about this stocking: the ankh symbol is associated with death/eternal life.  Perfect for a Christmas stocking...uh...right?!?!

Tuesday, December 20, 2011

And back to knitting again....

This is another older hat I never got around to posting about.  It's actually the hat full of black thread that caused all the problems I talked about in this post back here.  If I ever use Sugar 'n Cream's black yarn again (and I do have about half of it left over!), I'm definitely doing a vinegar bath or something.

I still think it's cute, though... but obviously this photo is pre-washing:

Bzzzzz

Knit in the round, size 10 needles with Sugar 'n Cream cotton yarn--I forget the color names, but it's basic black, white and yellow. I did an I-cord for the antennae (which I can vaguely remember not liking to make), and I winged (lame amirite?) the design for the wings.

After washing, it  turned out to be grey, yellow, and off-white. :(  I think it just passed being donate-able!

Wednesday, December 14, 2011

Finished!

Finally!  Save for one or two one-off stockings, I'm done sewing for the holidays. Just in time, these need to get in the mail soon, anyway. :) Not to mention, I was getting soooo bored of sewing Christmas stuff, only Black Sabbath and Slayer could keep me interested!

Unfortunately there was no sun at all today, so my photos might look extra shadowy.

Here's the first set of stockings that I didn't get photos of before (the last one might look extra funny because it's a bit full already!):

Patchwork Stockings

Patchwork Stockings

And a detail shot, maybe this will be better than the first one:

Patchwork Stocking Detail

Now, if you remember, the insides of these stockings as well as my Horde stockings look like this:

A Stocking Lining...

But the other eight stockings (the ones in the last post, and the ones I'm about to write about next) have a lining and a backing that looks like this, which is quite a bit more busy!

Another Stocking Lining

You see, the fabric I bought before wasn't on sale again when I figured out I bought way too little, so this Christmas fabric ended up being a bit cheaper.

Anyway, the last set of stockings were particularly inspired by my dad, who loves old Christmas stuff. I made what I thought looked like some old-ish ornament shapes and cut out my pieces--I just appliqued them on freely using an almost-satin stitch and my metallic thread.  I say almost-satin because I didn't want to pull the fabric too much, as I didn't use any stabilizer, fusing or starch, and I didn't want the pieces to stretch out of shape.  So instead of using a zig-zag stitch at "0", I used it halfway between 0 and 1.   To make them look like they were hanging, I used the same stitch to make lines (before I appliqued the pieces on, of course).  There's even a line on top of the big center ornament, but unfortunately the fur covers it up--that's a lack of planning on my part!

Retro Ornament Appliqued Stockings

Retro Ornament Appliqued Stockings

Retro Ornament Appliqued Stockings


Aaaaaaand that's all for now. :)

Monday, December 12, 2011

More Stockings!

Here's my second set of four stockings, all completed.   The last set of four is halfway done, and I still need to take pictures of the full first set that I gave a preview of in my last post (I got a new camera as an early Christmas present, by the way, so hopefully my pictures will improve!)

Wacky Stripe Stockings

Wacky Stripe Stocking

The toes look a little funny in these photos, but it's mostly the angle and my fiddling with them to make them all lie in a nice direction to photograph. They're not all 100% the same shape, either, but they're supposed to be all unique, so that's ok!

As with the first set, I laid out the pattern pieces I made on top of my stack of four fabrics, and cut out the pieces for all four stockings in one go with the rotary cutter. :)

I added some gold ric-rac and trim to these, so they're a little more bling-y than my first set. The hanging tabs also have ric-rac on them, as you can kind of see in the first photo!

And my favorite part--I added some hexagon appliques!

Wacky Stripe Stockings--Appliqued Hexagon Detail

I'm particularly thrilled with how they came out--I just cut out the shapes and ironed down the edges by eye, then sewed as close to the edge as I could manage. The only thing I would do differently again, however, is not use two threads on the top! You see, my metallic thread is a little more prone to breaking under stress, so I wanted to reinforce it by threading a strand of metallic and a strand of red thread through my machine at the same time... but I nearly caused tension and alignment issues when the red thread got too loose compared to the metallic and started bunching up in the bobbin area. Does that even make sense? I don't know, I'm just glad they look ok! You can see that stitching on the last two hexagons in the top picture look much more metallic--that's because I finally got fed up and took out the red top thread.

I'm also pretty impressed with these last macro photos: they're taken on my new camera with no flash! I'm not used to having the ability to toggle the flash on macros. Usually, I'm so shaky that without flash, macros come out a blurry mess. They were taken in quite blue-ish natural daylight (not quite sunny, but not overcast), so I did have to color edit them a bit to get them to look a little more true.

Tuesday, November 29, 2011

And now, for something different...

This is a hint as to what I've been doing lately: a whole lot of sewing!

stocking01
(Disclaimer: I still don't have a good camera, and I now live in a place with few ceiling mounted lights or large, airy windows.  So instead of photos with bad incandescent lighting, I now have photos with varied angles of bad incandescent lighting.)

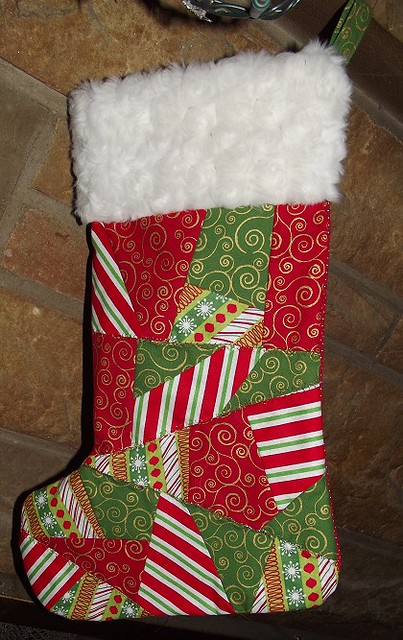
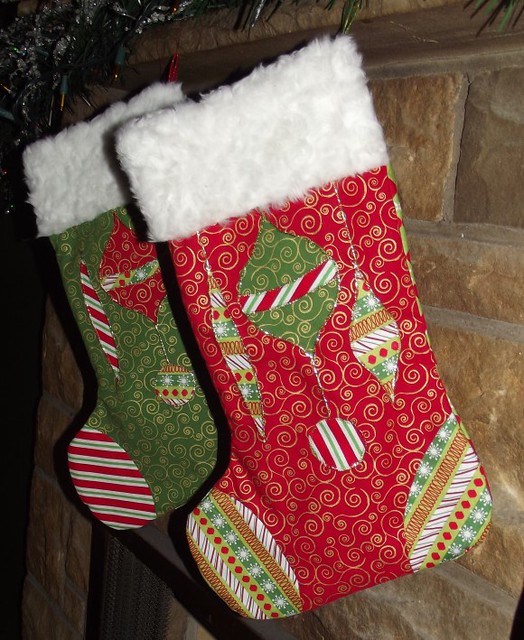
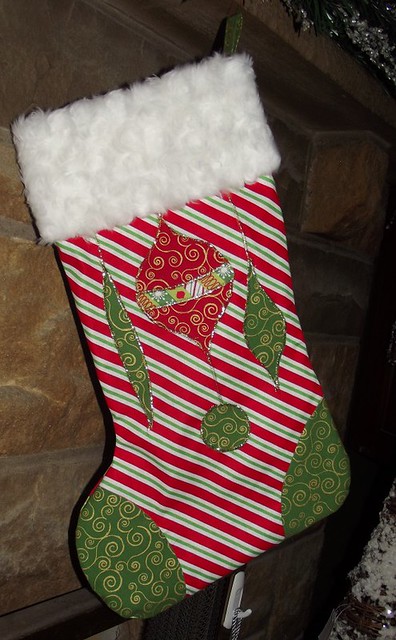
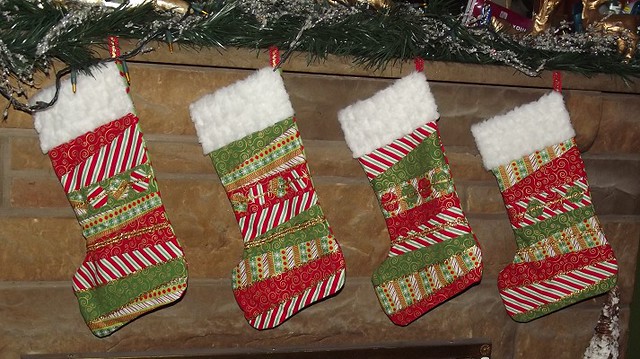
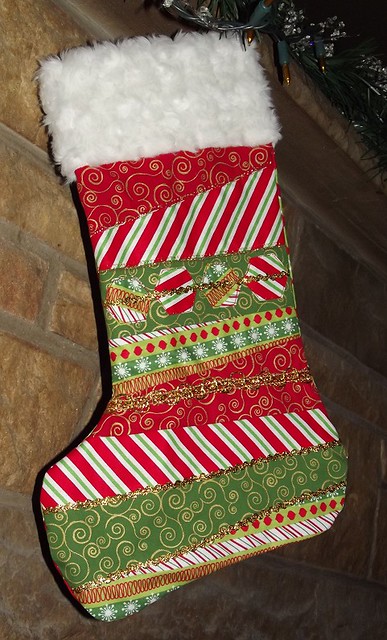
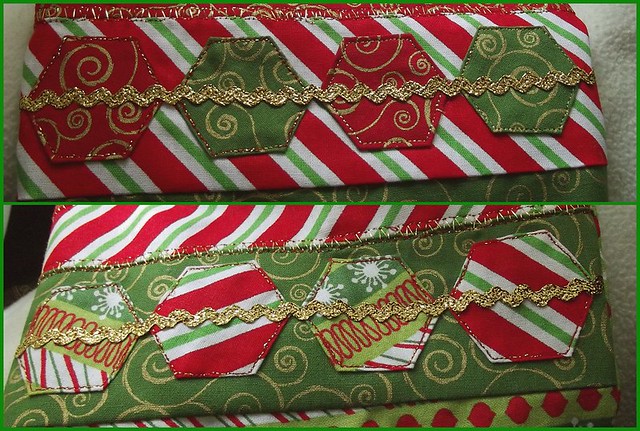
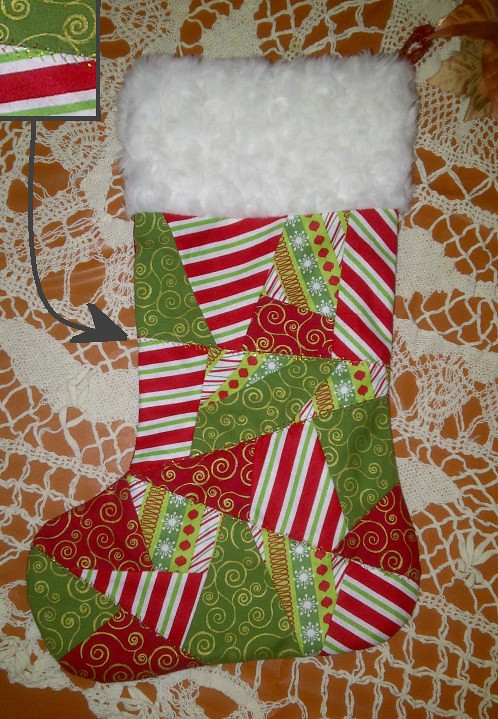
Actually, this isn't my biggest project, but I put that one aside to finish these sets of stockings up in time to ship off to my family for the holidays.  Since I'm not at home this year, I wanted to send my family something neat.

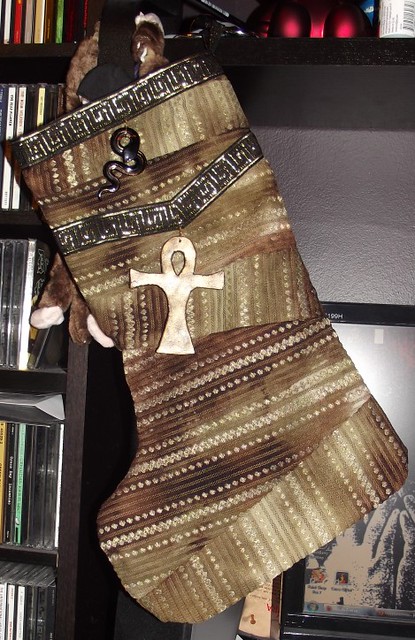
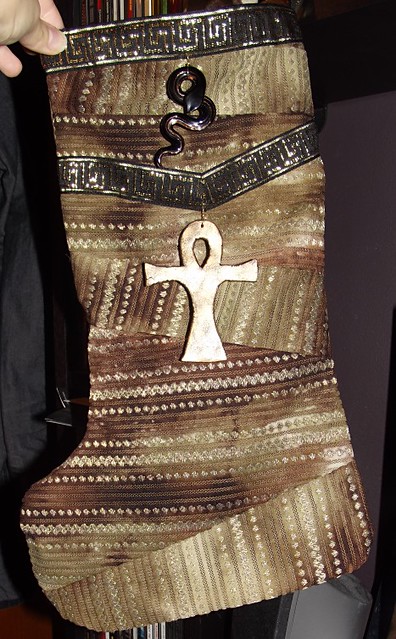
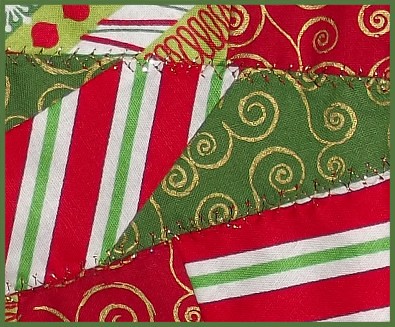
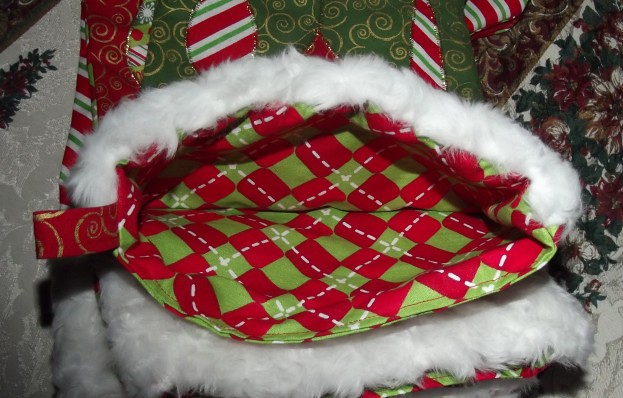
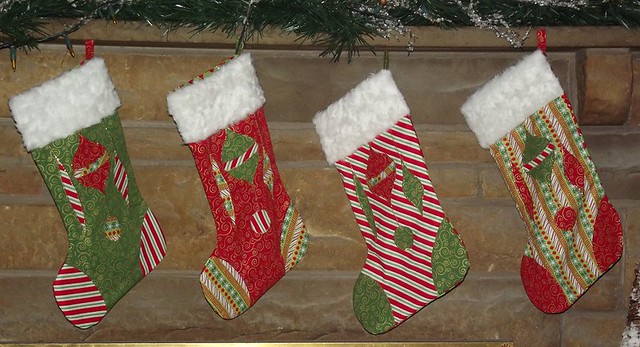
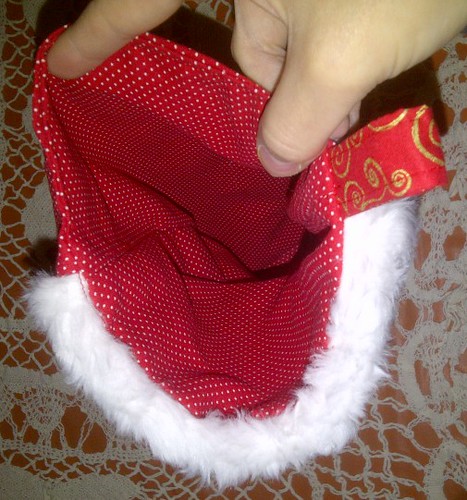
I say "these sets" and I only have photos of one stocking... oops.  I drafted the patterns on these and layered up my fabrics so I could cut out four stockings at once, and also so that each one would have a unique combination of fabrics.  I made all four of this style, but I only have photos of the first one so far.  I'm halfway done with a second "set" of four in a wonky stripe style, and a third set I'm planning to do with applique pieces... not fully sure how yet, though.  I didn't put batting or quilting on them, which I was kind of torn over doing, but I did try some metallic decorative stitching, and I did line them fully:

stocking02

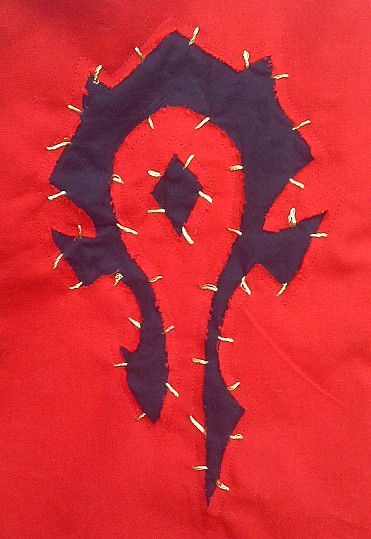
In addition to those, I also made these for my boyfriend's younger cousins:
HORDE STOCKINGS!


stocking03

All I can say is, he better be right about his cousins playing Horde-side, too, because 1) he is known to have some faulty memory errors here and there, 2) it would be really hard to applique that little lion crest thing, and 3) why would you play Alliance anyway?

So anyway, onto the details.  I always wanted to make some geeky-like applique, and this was the perfect chance.  I used a method that I think is called reverse applique, and I left the edges raw, because I felt it fit in style with the Horde--I even roughed the edges up with my fingernails.  To make the design, I printed the insignia on some freezer paper, then cut it out  with an xacto and ironed it onto my stocking pattern that I had backed with some black scrap fabric.  I then carefully sewed OUTSIDE of the pattern, and then cut right about on the edges of the pattern itself, but only through the red part of the fabric.  After I sewed the rest of the stocking up, I thought it looked kind of plain, so that was when I added the gold "rustic" top-stitching, to make it look a bit more like, say, the banners in Orgrimmar.  Ideally, I should have done this before sewing everything together; I ended up pulling the black fabric a bit weirdly since I could not hold it flat properly when sewing. 

I tried taking some detail shots, but keep in mind, low quality camera + reds + metallics = not so great macros.  I still wanted to keep some documentation of what I did, though!

stocking04

stocking05

And there you go! Hopefully I'll have more stockings to post, soon.  Sheesh, and I'm not even religious.

Monday, October 31, 2011

Happy Halloween... wait... Dia de los Muertes?

Well, it's a bit late for Halloween, and it is technically November 1st here.

I've been doing so many other kinds of projects lately (more than one of them have to do with Halloween--it is my favorite holiday, after all). But I've taken no photos.

I DID, however, manage to get pictures of the one most important Halloween project of all:  pumpkin carving!

I actually really like traditional simple pumpkin carving, but I tried to expand my horizons (and capabilities) a bit with the second one.

Ogre

Murloc

I've been playing just a little bit too much World of Warcraft lately (wait, no, it's not just lately...) So they're both a bit inspired. The second one is based on a murloc. :)

I have a few more old hats I haven't posted about yet, but I'll get to those later.

Friday, September 30, 2011

Ribbit! Ribbit!

Once again, I feel like it's been forever... because it has.  I've moved, I had a disaster with some yarn from Sugar 'n Cream, and between that all, I haven't felt like knitting.  I've started picking up some other crafts again (mainly sewing), but no pictures of anything else as of yet.  So this is another piece that's pretty old, and I was so proud of it... until I tell you my story.

Ribbit

Look how awesome that is, right?! I made the design for the tongue and the eyes freehand--the eyes are basically rectangular shapes with a decrease in the middle, sewn in half and embroidered with some black.  It's made with all Sugar 'n Cream cotton yarns in Black, Red, Yellow and Hot  Green, if I remember all the color names correctly. 

I started out trying to do an ombre sort of pattern--starting with more rows of yellow at the bottom of the hat, and interspacing them with the green until it was solid green at the top.  I'm not sure if that worked out as good as it seemed in my head, and it looked plain afterwards, so I decided to use the base of the hat for a frog idea that was floating around in my head. 

Then I washed it...

And I found out Sugar 'n Cream does not set their black dyes properly.  I tried to take into account some fabric bleeding, and I washed my batch of hats separately.  I even changed the water on the ones with black yarn about five times (it bled that much, but I thought it was done bleeding). But oh, no: this hat--and another hat with more black in it--got stacked together with some other hats when they were half dry. I thought everything would be ok.  FAIL.  Even after I washed the hats repeatedly, and even after they were half dry, the black still bled like a... well... something I shouldn't type here.  My whole batch of four or five hats had black dye on it.  It took a lot of chemicals, cleaning, bluing, soaking, and rewashing to get my hats clean again.  Even now, the batch I washed and screwed up are a little pill-y from all the washing, and a bit more dull than my glorious before-washing pictures. 


So yeah, that's why I haven't felt like knitting lately.  I'm still getting over my rage, let me tell you, internets.

Monday, August 1, 2011

Purple Cables.... Sort of.

Long time no see, internets! Unfortunately, I've been moving around, and I haven't felt like posting or even knitting for a while. :(  I better get back into it soon, but in the mean time, here's another one that's been waiting to be posted online (and sent out):

007

This one was kind of simple, I wanted to try out cable knitting more, but I didn't do my math quite right, so it came out looking more like some kind of medallions (there's one on each side of the hat) rather than cable knit stripes.  I don't think it photographed very well because of the stitching, either.  I still hope someone will be able to enjoy it, though!

This was made with Sugar 'n Cream cotton yarn in either Hot Purple or Soft Violet... I can't exactly remember what color anymore.

Thursday, July 7, 2011

Jack(rabbit)-in-the-Box

It's been a while, hasn't it?! But I finally got my new batch of hats gathered up, although these ones need to be washed still.

This one is another using Bernat's Baby Stretch "Jack in the Box" yarn.  It kind of looks like a court jester bunny!

Jack(rabbit)-in-the-box

I made up the hat itself as I went along, knitting in the round and making an alternate knit/purl stitch for the band (which would be considered straight purling if I was knitting flat, I guess).  I used Fiber Flux's tutorial for the ears, but I modified them... I didn't think I could knot them well, so I sewed them on upside down, with the point at the ends.  They're a little more floppy than I thought they would be at first, but I still like it. 

I think I need to show more detail on the ears, because I love the way they curl in on the inside, just like real ears would!  That's actually another reason I didn't want to knot them. But it's night time right now, so this is the best sort of picture I can get: 

Jack(rabbit)-in-the-box

Wednesday, June 29, 2011

My Masterpiece... The Babyhawk Hat!

I looooove this. I want to make it in every color combination possible.  Is it ok for baby girls to wear mohawk hats?  Because I soooooo want to make them in girly colors, too, but I know how sensitive parents can be about making sure their baby has proper conventional gender identifiers... or something like that. 

Anyway, onto the pics!

Babyhawk 3/4 View

Babyhawk Side View

This is made with the same yarn as the last post--Sugar 'n Cream's Mod Green and Mod Ombre.  I made up the design myself using the idea of a knitted heart pattern I had attempted a few days earlier.  Each strand of the 'hawk is tied individually and sewn on in rows of three, because I don't usually trust yarn to stay put if I don't tie it securely.  So I abandoned the idea of  the classic fringe-making trick. 

I think the pattern could use a tiny bit of perfecting... I mean, I basically made it all up as I went along, anyway, and I don't particularly like how I can see the bind off edge.   I also wasted quite a bit of yarn on the mohawk--it started life about an inch longer, which looked a little unruly, although it was easier to tie up.  This length is pretty perfect, though--it stands up on its own and is still very moveable and shape-able!

Monday, June 27, 2011

Bamboo Ombre Stripes

Well if that name doesn't sound like a spam post... Anyway!

Bamboo Stripes


I made this with Sugar' n Cream's yarns in Mod Ombre and Mod Green.  I tried out stripes with this, but you can't really tell due to the size and the different colors in the second yarn. I also tried out a different stitch; this is the bamboo stitch, I believe.  It's nice, but a little hole-y  when it stretches. Maybe if I used something different than my size 8 round needles....nah!

I'm sorry my photos  aren't the greatest, but it's all up to what comes out from my Blackberry, since my digital camera conveniently decided to bite the dust at the same time I wanted to start this project. :(

Wednesday, June 22, 2011

Jack in the Box

Ok, so I think THIS was technically my second piece.  The bottom band was made by knitting two, purling two, and repeating... and it kind of looks floppy in this picture.  Oh well!

003

I really like this yarn--I stop to look at it so much when using it that my knitting goes slower. :(  It's Bernat's Baby Stretch in "Jack in the Box".  And the piece was knitted in the round with the same size 8 needles I never put down. 

The top of the hat was made using a generic pom pom method, but because of the yarn (which I made sure to stretch out while winding), it came out like the softest, floppiest koosh ball ever.  I love it!  It also looks about as big as the hat itself, but the hat is very stretchy. 

Tuesday, June 21, 2011

A Venture in Textures

This may have actually been my third hat... Well, I'm pretty sure it WAS my third hat, but I made these first few all around the same time, anyway.

002

I just started to really figure out stitches--for some reason, on my first piece, it didn't really dawn on me that, "WOAH, I can knit to the FRONT or the BACK, and get different looks by doing so?"

So with this one I wanted to play around with the textures of stockinette front-to-back, and the way alternating makes pieces puff out. Oh, and the vertical stripped band versus the horizontal striped body of the hat.

It's so simple, but I really, really love it. Though it KIND OF looks like a ribbed condom or something when it puffs out.  Just sayin'. I think it kind of adds to the charm, though.

Knitted in-the-round with Sugar 'n Cream cotton yarn in Cream, I think.  And size 8 needles.  You'll soon see how insanely in love with these needles I am.

Monday, June 20, 2011

Second Post! My First Venture into Knitting...

Whew; still not sure I like the layout, but I figured why not get started with the hats--I want to send these babies off!

So this one is my first knitted creation ever.  It's made in two pieces and sewn together, with size 8 needles and an acrylic yarn--I believe it's Lion's Babysoft in "Twinkle".

First hat

I'm sure you've probably noticed.... yes, the stitching is sideways!  I was just starting out, and didn't know whether it would be wide enough or not, so my obvious solution was to turn it sideways instead.  Not very typical, but I like the look nonetheless.

The top part is all purled, and it's just a basic rectangle that is gathered up top.   The bottom is a cabled strip that was technically my second piece of knitting ever.  Yes, my second piece of knitting and I decide on a cable.  I don't think I did too bad, all things considered, right?  I could have used a little more care stitching it together, I think, as the shape leaves a bit to be desired.  But I keep telling myself, "it's very stretchy, so it will stretch into shape when it wants!"

Sunday, June 19, 2011

First post!

Hey there!

Welcome to the start of my blog.  I'm brand new to knitting, and I plan on using this page to catalog my journey and attempts at different crafty knits.  I'm not new to crafts by any means--I love sewing, jewelrymaking, and even a bit of painting and repurposing--but knitting was the one thing that always daunted me. Then I figured, "why am I ruining my hands all the time with sharp needles and bits of metal?  Why don't I try knitting?" 

When I found out my local hospital took donations of hand-knitted baby hats, I figured it would be the perfect way to get into the craft.  And it is! The hats are so small,  they're the perfect way to try out new stitches, color combinations and patterns. Plus, I won't be piling up useless crafty creations around my home, and I'll be helping out others, too. :)

Since I will be giving nearly all my creations away, I think a blog will be the perfect place to collect memories of them all together, as well as tracking my progress.

In the next few days, I'll probably be tweaking the layout quite a bit.  And my first batch of hats are just drying out from their baby-shampoo wash, so I plan on getting pictures of them soon, too!