So I haven't done much knitting lately, but I've done a whole lot of sewing.
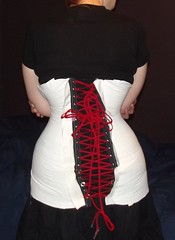
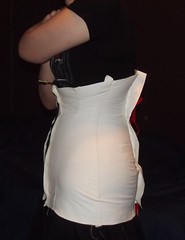
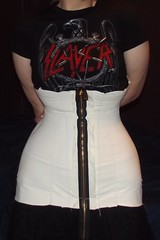
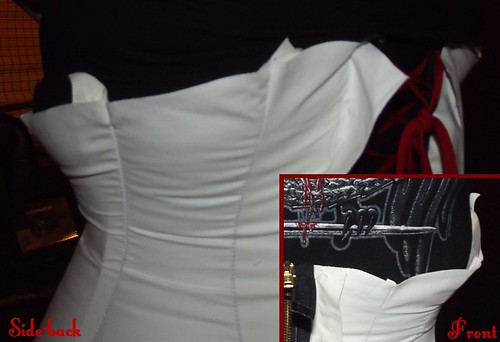
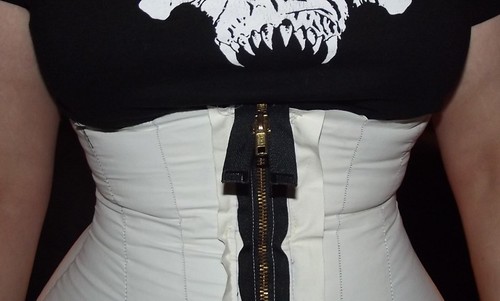
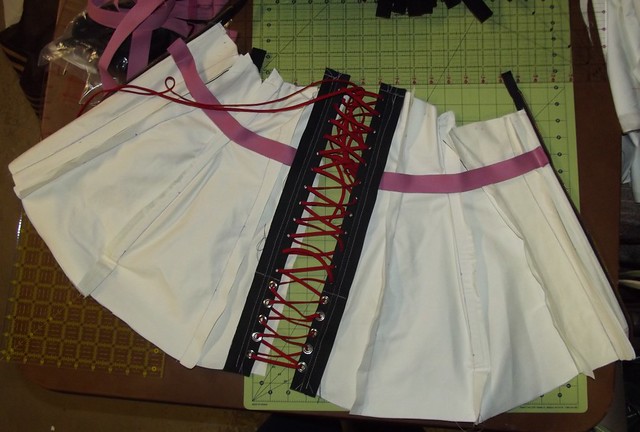
It came time to post our mockups for the 1911 corset sew-along. Here's mine!
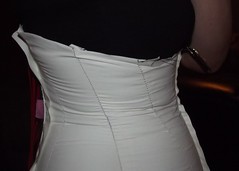
It looks pretty good, in my opinion--I'm particularly happy that I drafted the hips pretty well on my computer program. What I didn't draft well, though, was the increase in the underbust measurement:
It was way too big, and this was bothering me--should I just take out the amount I added? Would I really fit into an unmodified pattern for a 23 inch waist from the waist up? If I take that away, should I add some length up top? After all, I was kind of worried about some of the fat displacement you can see in the pictures, and it didn't seem like it would meet my underbust line very well, either.
But Jo over at Bridges on the Body suggested just taking out the extra first, before deciding on adding length. I'm glad I did!
There are a few issues with creasing, which I believe to be just the fabric and the lack of boning. Most importantly: there's no "spill-age"! And I may even need to take out a teensy bit from the length at the top front so it doesn't interfere with my underbust now. I already did some of this more "cosmetic" shaping at the bottom of the corset; it won't be too hard to adjust the top, so I doubt I'll even try on my mockup again.
Now I'm ready for the next step! :)
Tuesday, January 17, 2012
Saturday, January 14, 2012
1911 Sew Along so far!
Last post I mentioned I was joining a corset sew-along at Bridges on the Body. The author also hosts a flickr group that I end up checking about just as often as her blog--it's great for inspiration!
Well, I figured I'd quickly post some pictures of my progress so far--they've been hanging out on my flickr for a bit.
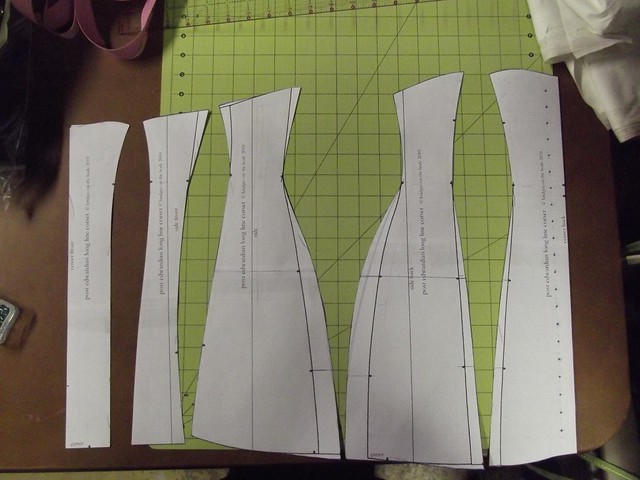
First we have my paint-shop modified pattern...
Since, you know, I'm a bit too curvy for a slim-lined teens corset. I mean, I feel like we're nearly getting into the flapper era, here--the era where women visually minimized hips into near non-existence!
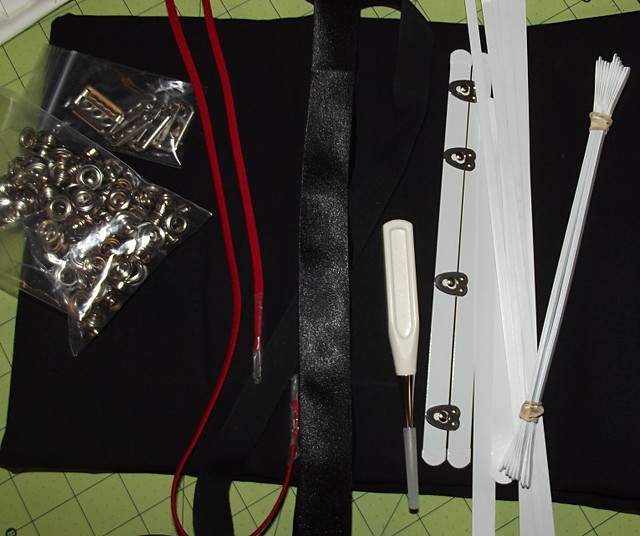
Then there's a sketchy photo of most of the materials I'll be working with...
And finally a picture of my mock-up!
Now, I do have photos of the mock-up fitting, since I got a bit carried away and worked quite a bit ahead (using some of my own methods, but it's great to hear about how others--including the sew-along organizer--do things!) But I'm trying to keep those hidden until it comes to the right time. :)
In the mean time I gave in and joined Pinterest, since I think everyone and their mother is on it, too. I'm a bit annoyed at some things (I have to have a twitter or facebook account...what?), but overall I realized that it's kind of like what I've done on my computer for years: saved a bunch of "inspiration" pictures. (Years, later I'm like, "what the hell is all this crap", and now I will spend another few years erasing all of it from my computer as I find it.) At least on Pinterest it's not clogging up my harddrive, and it's much more easily viewable, if I do say so myself.
Anyway, I've created an inspiration board for my sew-along corset.
And there you go!
Wednesday, January 11, 2012
Crop-A-Dile II "Big Bite" Grommet / Eyelet / Snap Setter
So I guess I never mentioned that I decided to join in on this sew-along:
It was kind of a last minute decision, anyway. I've got lots of corset materials back home; I've patterned a few, and I've started constructing even a few more, but I've never finished one! I figure this might help me do that, and maybe it will spur me on to sew more.... like that billionth cincher pattern I've made.
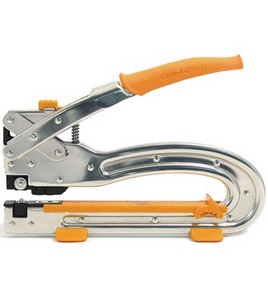
Any-who, how does that relate to the title of my post? Well, I had bought this oversized "Crop-A-Dile" a little while ago:
I figured now was the time to figure out how to use it--after all, I needed to make a simple lacing strip for my corset mockup, right? Since there's not many comprehensive reviews about this product when using it with heavy-duty grommets and fabric, I decided to write down my thoughts.
You see, it's a scrapbooking tool--you find it in the scrapbooking section of your arts and crafts store--but it markets itself as a tough product that can easily slice holes through things like fabric, cork board, and vinyl; and can set grommets, eyelets and snaps in almost all of the same. But most people online seem to be using it for a simple scrapbooking tool, and I really wanted to put it to the test!
I mean, it's not a new idea for garment making--if you were a professional corsetmaker or leather-worker, perhaps, you'd have a $150+ high-quality product like this one from corsetmaking.com. The Crop-A-Dile, on the other hand, sells for $40 retail at places like Joanns, where you can easily get 40% off (plus an extra 25% off) if you wait until the right time. At around $15, I figured I could live with the disappointment if this didn't work.
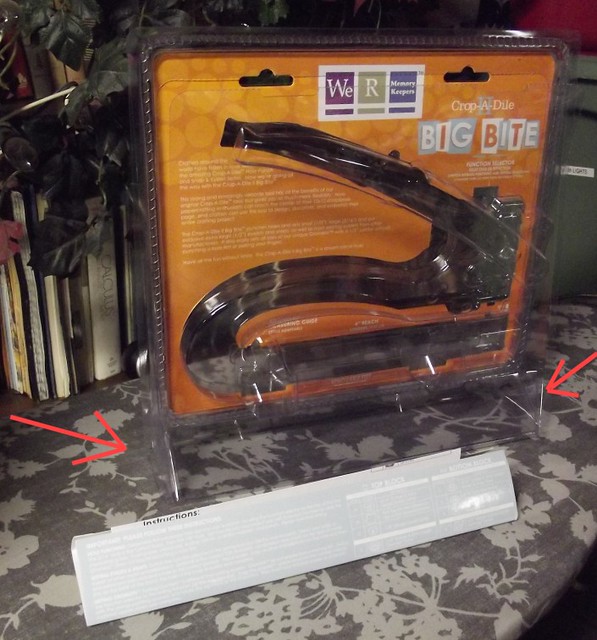
First of all, I get it out of the box and.... oh, where's the instructions?
You see, the plastic holding the setter itself has a nice, easily open-able perforated line. But the instructions? They're in that little triangular spot in the bottom that the arrows in the picture are pointing to. That isn't easily noticeable or as easily opened!
I have to say it cuts pretty well--that's one of the main problems I have with grommet setting. I would not use the hole punches for heavy duty corset making, but for fashion garments it would be pretty awesome. The only qualm I have is that it leaves fabric tags like so:
You know, like when you have an old fabric punch that only punches 95% of the circle? But that's very easily clipped away.
The main problem scrapbookers seem to have with this tool is that it is finicky with what metals it likes--it totally crushes cheap, soft metals. I was wondering if I would have the opposite problem; would this be tough enough to splay two-part rolling/flare grommets that are even harder than scrapbooking grommets--and even harder than playing fashion-garment grommets? Crop-A-Dile says it can do many kinds, and many different sizes of grommets, after all. I'd say that's only a partial truth:
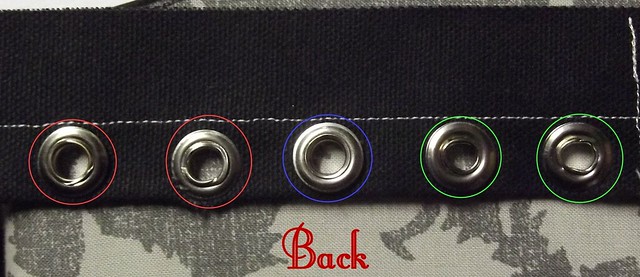
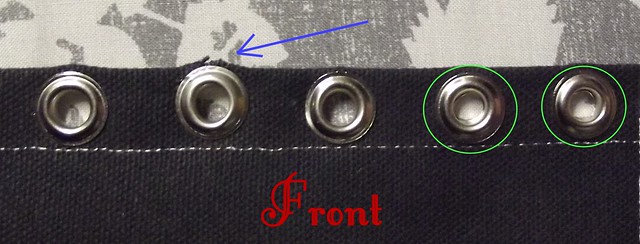
Here's the results of the first testing. (By the way, you can click on any of the images for a more detailed view, as well!) The ones on the right (in green) I tried to set solely with the Crop-A-Dile II. Well, they rolled/flared a little bit, but there's a whole lot of distortion. The ones on the far left (in red) were set with a combination of light hammering and then the setter, just to see if there'd be an improvement. You can also see a bit of crushing in those, too. The middle blue one is solely hammered just for comparison.
In the front view, you can also see a bit of distortion in the green grommets, if you look very closely:
So I guess the setter is strong enough to handle these things?! But it just doesn't handle them right!
After thinking about WHY it doesn't handle them right for a while, I came to this conclusion: my grommets are a size too big. I have size 0 grommets--in the wire-gauge world, that would be SMALLER than a size 00. In the grommet world, I guess that's different. Now, if the Crop-A-Dile lived up to its expectations, it SHOULD set grommets that are bigger than the 1/8 and 3/16 dials on the setter. But here's the thing: the "bigger than 3/16" dial on the setter is a generic one. It's not very well shaped! Maybe if I were using it for scrapbooking, it'd be fine, but it doesn't stand up to large sized high quality grommets. And I think that's the problem.
PS: Now curiosity is going to get the better of me, and I'll probably end up buying some 00 rolling grommets, so I can update again later on. I also have some fabric-store cheap grommets to try out, but I think those will work fine, too, considering it could mash these considerably harder ones!)
PSS: That blue arrow in the last picture? It shows that no method is infallible! When hammer-setting my grommets, accidentally mashed my hammer down on my fabric instead of my hand held grommet setter, and made a nice, weak, gaping hole. Oops.
It was kind of a last minute decision, anyway. I've got lots of corset materials back home; I've patterned a few, and I've started constructing even a few more, but I've never finished one! I figure this might help me do that, and maybe it will spur me on to sew more.... like that billionth cincher pattern I've made.
Any-who, how does that relate to the title of my post? Well, I had bought this oversized "Crop-A-Dile" a little while ago:
You see, it's a scrapbooking tool--you find it in the scrapbooking section of your arts and crafts store--but it markets itself as a tough product that can easily slice holes through things like fabric, cork board, and vinyl; and can set grommets, eyelets and snaps in almost all of the same. But most people online seem to be using it for a simple scrapbooking tool, and I really wanted to put it to the test!
I mean, it's not a new idea for garment making--if you were a professional corsetmaker or leather-worker, perhaps, you'd have a $150+ high-quality product like this one from corsetmaking.com. The Crop-A-Dile, on the other hand, sells for $40 retail at places like Joanns, where you can easily get 40% off (plus an extra 25% off) if you wait until the right time. At around $15, I figured I could live with the disappointment if this didn't work.
First of all, I get it out of the box and.... oh, where's the instructions?
You see, the plastic holding the setter itself has a nice, easily open-able perforated line. But the instructions? They're in that little triangular spot in the bottom that the arrows in the picture are pointing to. That isn't easily noticeable or as easily opened!
I have to say it cuts pretty well--that's one of the main problems I have with grommet setting. I would not use the hole punches for heavy duty corset making, but for fashion garments it would be pretty awesome. The only qualm I have is that it leaves fabric tags like so:
You know, like when you have an old fabric punch that only punches 95% of the circle? But that's very easily clipped away.
The main problem scrapbookers seem to have with this tool is that it is finicky with what metals it likes--it totally crushes cheap, soft metals. I was wondering if I would have the opposite problem; would this be tough enough to splay two-part rolling/flare grommets that are even harder than scrapbooking grommets--and even harder than playing fashion-garment grommets? Crop-A-Dile says it can do many kinds, and many different sizes of grommets, after all. I'd say that's only a partial truth:
Here's the results of the first testing. (By the way, you can click on any of the images for a more detailed view, as well!) The ones on the right (in green) I tried to set solely with the Crop-A-Dile II. Well, they rolled/flared a little bit, but there's a whole lot of distortion. The ones on the far left (in red) were set with a combination of light hammering and then the setter, just to see if there'd be an improvement. You can also see a bit of crushing in those, too. The middle blue one is solely hammered just for comparison.
In the front view, you can also see a bit of distortion in the green grommets, if you look very closely:
So I guess the setter is strong enough to handle these things?! But it just doesn't handle them right!
After thinking about WHY it doesn't handle them right for a while, I came to this conclusion: my grommets are a size too big. I have size 0 grommets--in the wire-gauge world, that would be SMALLER than a size 00. In the grommet world, I guess that's different. Now, if the Crop-A-Dile lived up to its expectations, it SHOULD set grommets that are bigger than the 1/8 and 3/16 dials on the setter. But here's the thing: the "bigger than 3/16" dial on the setter is a generic one. It's not very well shaped! Maybe if I were using it for scrapbooking, it'd be fine, but it doesn't stand up to large sized high quality grommets. And I think that's the problem.
PS: Now curiosity is going to get the better of me, and I'll probably end up buying some 00 rolling grommets, so I can update again later on. I also have some fabric-store cheap grommets to try out, but I think those will work fine, too, considering it could mash these considerably harder ones!)
PSS: That blue arrow in the last picture? It shows that no method is infallible! When hammer-setting my grommets, accidentally mashed my hammer down on my fabric instead of my hand held grommet setter, and made a nice, weak, gaping hole. Oops.
Monday, January 9, 2012
Halloween (is Everyday), Hey!
Man, I've been working on this since about September, and now It's the new year, and I've not posted anything about it yet.
It's my first quilt, and I decided after a while to go with the "quilt as you go" method. I'm glad I did! I finally got done quilting all but 4 of the squares, so I decided to take photos of all of them and put them together in a "mockup" to ensure I liked the placement. And seriously, before I "photoshopped" in the sashing that these pieces will have when they're joined together, it looked WAY TOO BUSY.
But now... now it just looks awesomely tacky, like it should!
The only blocks I don't have individual pictures of are the 54/40 blocks, but they're all the same layout. The pictures aren't the greatest to show color and detail, but they're just for mockup purposes, so I think they serve their purpose well. The other blocks were all of my own invention, except the spiderwebs. I tried "wonky paper piecing" for two of the spiderwebs, but it just did not work out for me (can you see? They look way too wonky!), so I developed my own method to make the other four, anyway.
This will have 2.5 more borders around it as well, so it's not quite close to done yet.
And I also have a few other sewing and knitting projects in the works, too. :)
Tuesday, January 3, 2012
Last one! For a Little Flower Girl
This is the last of my hats that I've had in queue to be posted about for months.
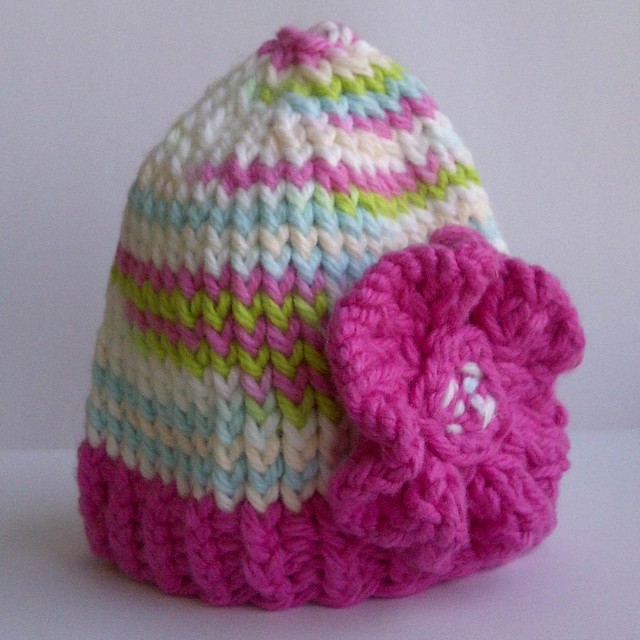
It's a really small hat...really, really small. But I loved the yarns I used for it--I think the variegated yarn is Sugar'n Cream's "Lava Lamp", and the pink that compliments it pretty well is their "Hot Pink".
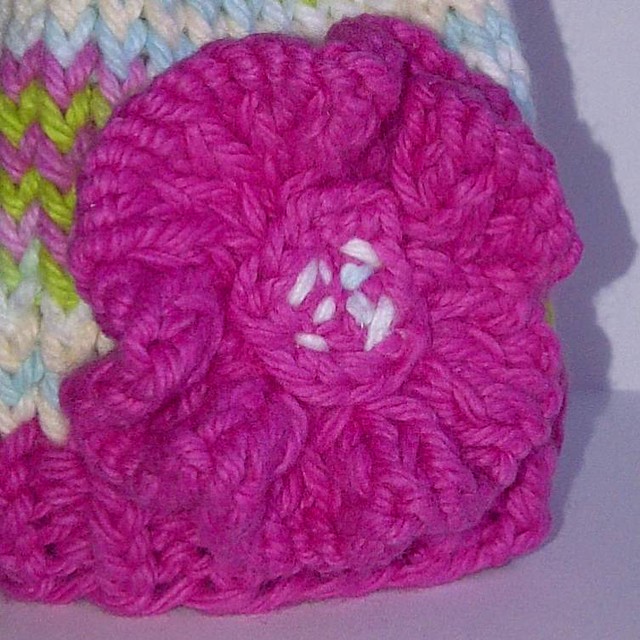
I also really liked the flower I made, even though I can't remember exactly how I made it! I know I didn't use a tutorial... I think I just started casting on A LOT of stitches, and then knitting 2 together every third stitch after two rows, and probably knitting 2 together every other stitch after that. Something like that. I wanted to make a rosette, but the middle turned out too small--so I stitched it together in a big circle and came up with this flower. :) The middle came out pretty hard-feeling since it's so dense, so I stitched in a few accents in the variegated yarn to make it look button-like.
I tried getting a close up, but this is from my camera phone, so it's not that great:
Now that I'm all done with my "back catalog", I should have a few more hats done soon!
Saturday, December 31, 2011
"Country Side" Brambles and Seeds
I don't know what to call this one, honestly. I really wanted to try out the bramble stitch, but I tend to work with my yarn so tightly that it didn't really go well for me--even less so considering I used a variegated yarn that didn't show off the intricate pattern. So the brambles turned into a small "band" at the bottom of the hat, and I finished up with a much easier double seed stitch. Funnily enough, with the variation the yarn makes, you can hardly tell the difference between the two stitches right away, and it looks like one really texturized blob. Oh well; at least they're pretty colors?!
"Country Side" comes from name of the Sugar'n Cream yarn I used. And as usual, I used my size 10 round needles, though I didn't knit this in the round (they're just so much easier to use!)
I only have one more old hat (el oh el) yet to post about...which is good I guess, because I just picked up my needles again and have about two more to show when I get around to it.
Tuesday, December 27, 2011
Blogger's Choice Fat Quarter Bundle
Two posts in one day... what's happening to me?
But I do like mixing and matching my own fabrics, so I figured, why not try out this "contest"?!
The Fabrics (Hopefully these links won't expire!)
Solids:
One Two and Three
Prints, by color:
One Two Three and Four
One Two Three and Four
One Two Three and Four
This started with the three "Delighted" fabrics, but of course I wanted to mix in some simpler prints and such. Since I tend to like working on small things, I chose a lot of smaller prints, but the larger prints would be perfect for mixing in larger blocks to fill things out. I always like mixing and matching--big with small, old with new, etc.--so I think there's a bit of variety here. I've had the color palette in my head for a while: turquoise and red is so popular, so why not make it an almost-perfect primary trio? I think the color palette is very summery, not to mention it works for many ages... I tried to pick fabrics that weren't overtly floral, too, so it's a bit more gender neutral, as well, I think.
I'm quite the novice at this kind of stuff, so I'm not sure how I did... Not to mention, since I can't see the fabrics in person, I'm unsure of how all the subtle differences in the individual reds, yellows, and blues will look. In any case, I know I want to make something featuring a similar palette in the future.
On a related note, I'm totally considering getting this from their store... It's even on sale right now! And because... arggg, they're pirates!
Subscribe to:
Posts (Atom)

